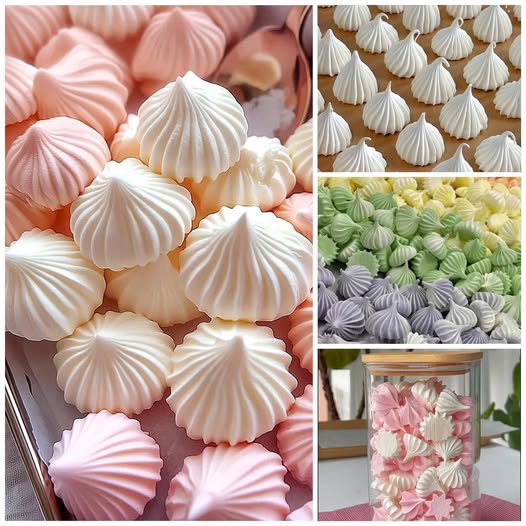
These delicate meringue candies are the epitome of sweet perfection – light as air, crispy on the outside, and melt-in-your-mouth tender on the inside. With just three simple ingredients and endless color possibilities, these elegant confections make stunning gifts, party favors, or afternoon treats. Whether you’re a beginner baker or experienced pastry chef, mastering these beautiful meringue candies will add a touch of French patisserie elegance to your dessert repertoire.
Ingredients
- 80g / 1/3 cup egg whites (approximately 2-3 large eggs)
- 80g / 2/3 cup powdered sugar (confectioner’s sugar)
- A few drops fresh lemon juice
- Food coloring (optional)
- Vanilla extract or other flavorings (optional)
Equipment Needed
- Stand mixer or hand mixer
- Large mixing bowl
- Piping bag with star tip (or spoon)
- Baking sheets
- Parchment paper
- Wire cooling racks
- Clean kitchen towels
Step-by-Step Instructions
Step 1: Prepare Your Workspace
Preheat your oven to 90-100°C (194-212°F). Line two large baking sheets with parchment paper. Ensure all equipment is completely clean and grease-free, as any residue can prevent the egg whites from whipping properly. Separate your eggs when they’re cold, but allow the egg whites to come to room temperature for about 30 minutes before whipping.
Step 2: Whip the Egg Whites
Place the egg whites in a clean, dry mixing bowl. Using a stand mixer with whisk attachment or hand mixer, begin beating the egg whites on medium speed. As they start to foam, add a few drops of fresh lemon juice. The acid helps stabilize the whites and creates a more stable meringue.
Step 3: Achieve Firm Peaks
Continue beating the egg whites until they form firm peaks. This means when you lift the whisk, the peaks should hold their shape but still have a slight curve at the tips. Be careful not to overbeat at this stage, as you’ll continue mixing when adding the sugar.
Step 4: Gradually Add Powdered Sugar
With the mixer running on medium speed, gradually add the powdered sugar one tablespoon at a time. This slow incorporation is crucial for achieving the proper texture. Continue beating until the mixture forms stiff, glossy peaks that hold their shape completely when the whisk is lifted.
Step 5: Add Color and Flavor
If desired, add food coloring using a toothpick to control the amount. Start with just a tiny amount – you can always add more. Gently fold in the coloring with a spatula to create either uniform color or beautiful marbled effects. Add any extracts or flavorings at this stage.
Step 6: Shape the Meringues
Transfer the meringue to a piping bag fitted with a large star tip, or use a spoon to create rustic shapes. Pipe small rosettes, shells, or kisses onto the prepared parchment paper, spacing them about 2cm apart. For uniform shapes, hold the piping bag perpendicular to the baking sheet and squeeze steadily.
Step 7: Bake Low and Slow
Place the baking sheets in the preheated oven and bake for 1.5 hours. The meringues are done when they feel dry to the touch and lift easily off the parchment paper without sticking. They should be crisp on the outside but may still be slightly soft in the center.
Step 8: Cool and Store
Turn off the oven and leave the meringues inside with the door slightly ajar for another 30 minutes to cool gradually. This prevents cracking from sudden temperature changes. Once completely cool, store in an airtight container for up to one week.
Nutritional Information
Per Meringue Candy (makes approximately 24 pieces):
- Calories: 15
- Fat: 0g
- Saturated Fat: 0g
- Carbohydrates: 3.8g
- Sugar: 3.7g
- Protein: 0.5g
- Sodium: 8mg
- Cholesterol: 0mg
Timing Guide
- Preparation Time: 20 minutes
- Whipping Time: 8-12 minutes
- Shaping Time: 15 minutes
- Baking Time: 1.5 hours
- Cooling Time: 30 minutes
- Total Time: 2 hours 45 minutes
Recipe Variations and Substitutions
Flavor Variations
Chocolate Meringues: Sift 1 tablespoon of unsweetened cocoa powder with the powdered sugar before adding to the egg whites for rich chocolate flavor.
Almond Meringues: Add 1/4 teaspoon almond extract and fold in 2 tablespoons of finely ground almonds for a sophisticated nutty taste.
Citrus Meringues: Add finely grated zest of one lemon, lime, or orange along with the corresponding extract for bright, fresh flavor.
Coffee Meringues: Dissolve 1 teaspoon of instant coffee in 1 teaspoon of hot water, cool, then fold into the finished meringue.
Rose Meringues: Add a few drops of rose water and pink food coloring for an elegant floral treat.
Dietary Substitutions
Vegan Alternative: Use aquafaba (liquid from canned chickpeas) in place of egg whites. Use 90ml aquafaba and whip longer to achieve proper peaks.
Sugar-Free Option: Replace powdered sugar with powdered erythritol or monk fruit sweetener, though texture may be slightly different.
Natural Coloring: Use freeze-dried fruit powders, beetroot powder, or matcha powder instead of artificial food coloring.
Professional Tips for Perfect Meringues
The key to perfect meringues lies in understanding humidity and temperature. Avoid making meringues on humid days, as moisture in the air can prevent them from drying properly. If your kitchen is humid, extend the baking time by 15-30 minutes.
For professional-looking results, invest in quality piping tips and practice consistent pressure when piping. You can create stunning ombre effects by adding different amounts of food coloring to separate portions of meringue.
Storage and Serving Suggestions
Store finished meringues in airtight containers with parchment paper between layers to prevent sticking. They can be kept at room temperature for up to one week, though they’re best enjoyed within the first few days for optimal crispness.
These meringue candies make beautiful additions to dessert platters, can be crushed and folded into ice cream, or used as elegant cake decorations. For special occasions, consider packaging them in clear boxes tied with ribbons for gorgeous homemade gifts.
Frequently Asked Questions
Why didn’t my meringues turn out crispy?
Meringues that remain soft or chewy usually indicate insufficient baking time or high humidity. Ensure your oven temperature is accurate and extend baking time if necessary. The meringues should feel completely dry and lift easily from the parchment paper when done.
Can I make meringues ahead of time?
Absolutely! Meringues are excellent make-ahead treats. Store them in airtight containers for up to one week, or freeze for up to one month. Thaw at room temperature before serving, and they’ll taste just as fresh as when first made.
What causes meringues to crack or weep?
Cracking typically occurs from temperature shock or overbeating the egg whites. Ensure gradual cooling by leaving meringues in the turned-off oven. Weeping (liquid pooling) usually results from underbaking or humid conditions. Always bake until completely dry.
How do I fix meringue that won’t hold peaks?
If your meringue won’t peak properly, check that your bowl and whisk are completely clean and grease-free. Even a small amount of fat can prevent proper whipping. Also ensure no egg yolk contaminated the whites, and that you’re adding sugar gradually.
Can I pipe meringues in advance before baking?
Yes, you can pipe meringues and let them sit at room temperature for up to 2 hours before baking. This actually helps them hold their shape better during baking. However, don’t refrigerate piped meringues, as this can cause them to deflate.
These delicate meringue candies offer endless possibilities for creativity and customization. Their naturally fat-free composition makes them a guilt-free indulgence, while their elegant appearance elevates any dessert presentation. Master this fundamental technique, and you’ll have a versatile skill that can be adapted for countless sweet creations, from pavlovas to buttercream components.