Are you craving a luscious dessert but want to skip the hassle of baking? Look no further! We’ve got a mouthwatering recipe that requires no flour, no oven, and definitely no gelatin. Brace yourself for a delightful experience with our no-bake chocolate milk dessert. Let’s dive into the world of flavors without the fuss!
Ingredients: Gather the Goodness
1. Milk Magic (500 ml):
Start with the star of the show – 500 ml of milk. It forms the creamy base, setting the foundation for our delectable treat.
2. Dark Chocolate Dreams (90 g):
Introduce richness with 90 g of dark chocolate, cut into irresistible pieces. It’s the decadent element that elevates the dessert to a whole new level.
3. Sweetness Sans Guilt (50 g of Stevia or 100 g of Sugar):
Choose your sweetness level – opt for guilt-free indulgence with 50 g of stevia or embrace classic sweetness with 100 g of normal or cane sugar.
4. Cocoa Power (30 g):
Enhance the chocolatey goodness with 30 g of cocoa powder. A key player in creating that velvety texture we all love.
5. Water Whispers (20 ml):
A mere 20 ml of water brings harmony to the ingredients, ensuring a smooth blend of flavors.
6. Agar Agar Adventure (10 g):
Wave goodbye to gelatin! Embrace the magic of 10 g of agar agar for a perfect setting without the need for an oven.
7. Salt (A Pinch):
Every sweet journey needs a hint of salt for balance. Add a pinch to enhance the overall flavor profile.
Preparation: Crafting the Culinary Symphony
1. Milk Marvel (400 ml + 100 ml):
In a saucepan, combine 400 ml of milk with your chosen sweetener and a pinch of salt. Let the magic begin as you turn on the heat.
2. Cocoa Alchemy (Cocoa + 100 ml Milk):
In a separate bowl, create a velvety cocoa mixture with the remaining 100 ml of milk. Pour this into the saucepan, stirring to perfection.
3. Chocolate Fusion:
Introduce the dark chocolate into the mix, creating a heavenly fusion. Stir gently, letting the chocolatey aroma fill the air.
4. Agar Agar Elegance:
Dissolve agar agar in water and add it to the mix. Watch as your dessert transforms, promising a delightful texture without an oven.
5. The Boil Ballet:
Allow the mixture to boil, stirring occasionally. The anticipation builds as the flavors meld together into a symphony of taste.
6. Carton Chronicles:
Turn off the heat and transfer the concoction into an empty milk carton. This step sets the stage for the dessert’s final act.
7. Refrigerator Retreat:
Pop the carton into the refrigerator, letting your creation firm up for 2-3 hours. Patience is a virtue, and the reward is worth it.
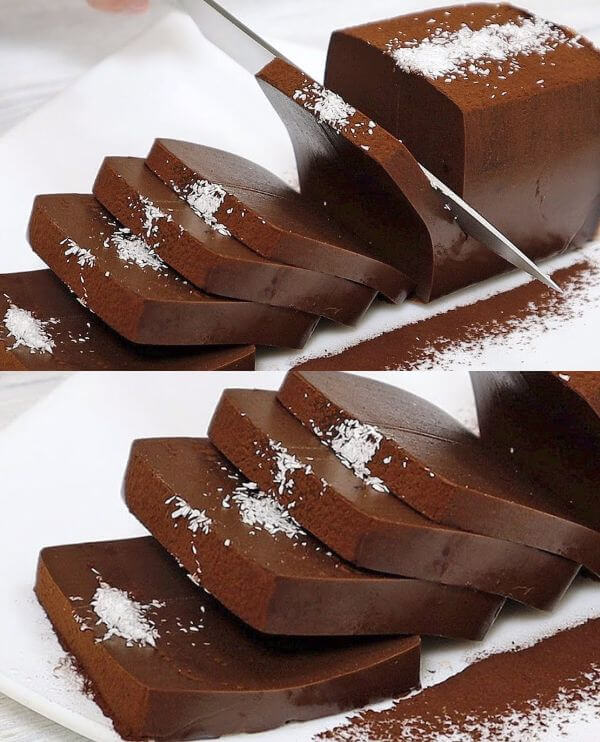
8. Unveiling the Dessert:
Once ready, unveil your masterpiece from the carton, placing it on a plate. Garnish with cocoa and coconut flakes for an extra touch of elegance.
9. Serving Sensation:
Your no-bake chocolate milk dessert is ready to captivate taste buds. Serve with pride and watch as everyone indulges in the symphony of flavors.
Conclusion: The Sweet Symphony Continues
In conclusion, this no-bake chocolate milk dessert proves that creating culinary delights can be easy and enjoyable. Say goodbye to flour, ovens, and gelatin – and say hello to a heavenly treat that’s bound to become a favorite. So, what are you waiting for? Dive into the world of sweet indulgence today!
FAQs: Answering Your Sweetest Questions
- Can I use normal sugar instead of stevia? Absolutely! Choose your preferred sweetener – whether it’s 50 g of stevia for a guilt-free option or 100 g of sugar for a classic sweetness.
- Why agar agar instead of gelatin? Agar agar is a vegetarian alternative to gelatin, offering the same setting properties without the need for animal products.
- How long should I let the dessert firm up in the refrigerator? Give it 2-3 hours for the perfect consistency. This step ensures a delightful texture without the need for an oven.
- Can I customize the toppings? Certainly! Get creative with your garnishes. Sprinkle cocoa and coconut flakes for an elegant finish, or experiment with your favorite toppings.
- Is this dessert suitable for lactose intolerant individuals? Yes, you can use lactose-free milk for a lactose-friendly version. Enjoy the same deliciousness without any discomfort!
The journey of creating this no-bake chocolate milk dessert is a celebration of simplicity and taste. Try it today and embark on a culinary adventure that delights the senses!