Introduction
Discover a culinary secret from a renowned restaurant with this exquisite recipe that combines peas and flour for a delightfully unique and savory creation. This recipe transforms simple ingredients into a delicious, savory pie that will captivate your taste buds and leave you craving more. Perfect for any occasion, this dish is both nutritious and delectable, showcasing the versatility of peas in baking.
Ingredients
- Peas (300 grams) – 10.6 oz
- Flour (300 grams) – 10.6 oz
- Granulated sugar (5 grams) – 1 teaspoon
- Dry yeast (5 grams) – 1 teaspoon
- 1 egg
- Olive oil (50 milliliters) – 3.4 tablespoons
- Yogurt (amount as needed)
- Sesame seeds (amount as needed)
- Warm water (100 milliliters) – 1/2 cup
- Salt (1/2 teaspoon)
- Preparation time: 20 minutes
- Resting time: 1 hour 30 minutes
- Cooking time: 30 minutes
- Total time: 2 hours 20 minutes
- Servings: 12 pieces
Instructions
Step 1: Prepare the Pea Mixture
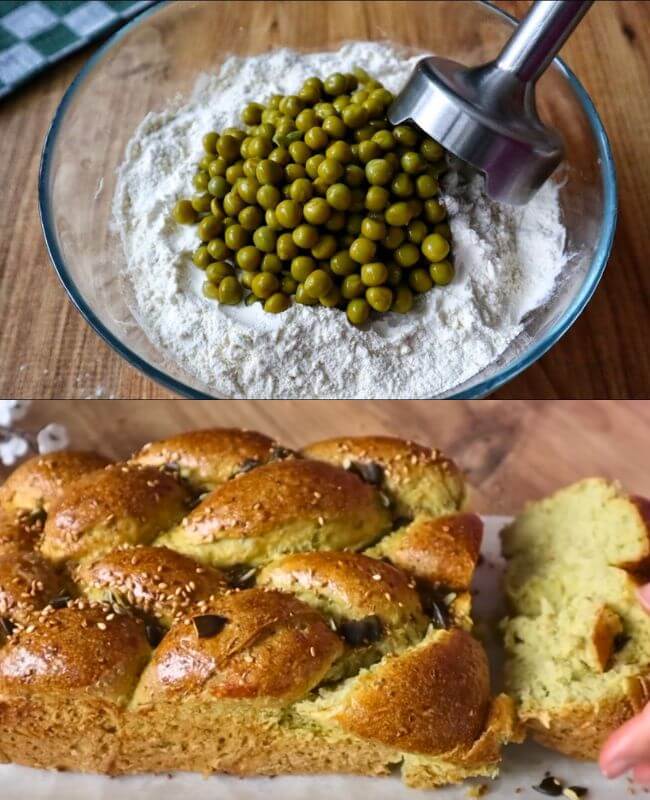
- Blend the Peas: Start by placing 300 grams of peas in a bowl. Add half a teaspoon of granulated sugar, 1 egg, 100 milliliters of warm water, and half a teaspoon of salt. Use an immersion blender to blend everything into a smooth pulp. This step is crucial to achieve the right texture for the dough.
Step 2: Make the Dough
- Combine Ingredients: Add the dry yeast to the pea mixture and stir well. In a separate bowl, sift 300 grams of flour, then combine it with the pea mixture. Mix thoroughly until the ingredients are well incorporated.
- Add Olive Oil: Pour in the olive oil and use your hands to mix and knead the dough until it becomes smooth and elastic. This should take about 5-7 minutes.
- Rest the Dough: Cover the dough with a cloth and let it rest in a warm place for 1 hour. This allows the yeast to activate and the dough to rise.
Step 3: Shape the Dough
- Knead Again: After the dough has rested, knead it briefly to release any air bubbles. Shape it into an elongated form and cut it into sections.
- Form Balls and Strips: Take each section and form small balls. Then roll each ball into strips.
- Create Braids: Intertwine the strips to form braids, as shown in the figure. This step not only gives the dough a beautiful appearance but also ensures an even bake.
- Second Rest: Place two braids on a baking tray lined with parchment paper. Cover them with a cloth and let them rest for an additional 30 minutes.
Step 4: Bake the Savory Pie
- Preheat the Oven: Preheat your oven to 160°C (320°F) to ensure it’s ready for baking.
- Prepare the Egg Wash: In a small bowl, mix a little yogurt with an egg to create an egg wash. Brush this mixture generously over the surface of the braids. This will give the braids a beautiful golden-brown finish.
- Add Sesame Seeds: Garnish the top of the braids with sesame seeds to add a delightful crunch and visual appeal.
- Bake: Place the tray in the preheated oven and bake for 30 minutes, or until the braids are golden brown and cooked through.
Serving
Once baked, remove the savory pie from the oven and let it cool slightly before serving. The savory pie with peas is now ready to be enjoyed! Serve warm or at room temperature as a delightful snack or accompaniment to a meal.
Nutrition Information
- Calories: 180 per piece
- Total Fat: 7g
- Saturated Fat: 1g
- Cholesterol: 25mg
- Sodium: 150mg
- Total Carbohydrates: 25g
- Dietary Fiber: 3g
- Sugars: 2g
- Protein: 6g
Conclusion
This savory pie with peas is a testament to the creativity and innovation of culinary arts. By combining simple, wholesome ingredients, you can create a dish that is not only visually stunning but also incredibly delicious. This recipe is perfect for impressing guests or adding a unique twist to your everyday meals. Enjoy the delightful flavors and textures of this savory pie, and relish the satisfaction of making a restaurant-quality dish at home.