Are you tired of running to the store every time you crave fresh bread? Say no more! With this easy and foolproof recipe, you can whip up delicious homemade bread in just five minutes of prep time. No fancy equipment required, just a few simple ingredients and a desire for freshly baked goodness. Let’s dive into the world of baking and discover how you can become a bread-making pro right in your own kitchen.
Importance of Fresh Yeast
Ever wondered why your homemade bread doesn’t turn out as fluffy and delicious as you hoped? The secret lies in the yeast! Using fresh, active dry yeast is crucial for achieving that perfect rise and texture in your bread. Stale or inactive yeast can leave your bread flat and uninspiring. So, always ensure you have fresh yeast on hand and store it properly in the refrigerator to maintain its potency.
Gathering Your Ingredients
Before we embark on our bread-making journey, let’s gather our ingredients. You’ll need:
- 5.5 cups of flour
- 562.5 ml (2 1/4 cup) of water
- 2 1/4 tsp of active dry yeast
- 1/4 cup of sugar
- 2 tbsp. of olive oil
- 1 tbsp. of salt
- Butter (optional, for topping)
With these simple ingredients, you’re well on your way to creating bakery-worthy bread right in your kitchen.
Mixing and Kneading the Dough
Now that we have our ingredients ready, it’s time to get our hands dirty (literally)! Start by dissolving the yeast in warm water with a pinch of sugar. This step ensures that the yeast is activated and ready to work its magic. Once foamy, mix in the flour, sugar, olive oil, and salt until a smooth, slightly sticky dough forms. Knead the dough until it’s elastic and springs back when touched.
Letting the Dough Rise
Patience is key when it comes to bread-making. Allow your dough to rise for about an hour in a warm, draft-free environment. Cover it with a clean towel or plastic wrap to prevent it from drying out. During this time, the yeast will work its magic, causing the dough to double in size and develop those desirable pockets of air that give bread its light and airy texture.
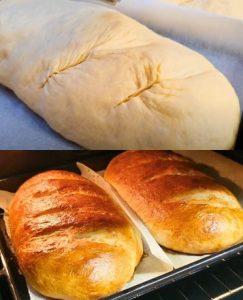
Shaping Your Bread
Once your dough has doubled in size, it’s time to shape it into loaves. Divide the dough into two equal portions and roll each into a rectangle about 20 cm wide. Starting from the shortest side, roll the dough into cylinders to create your loaves. Place them in oiled molds, cover, and let them rise for another hour.
Second Rise and Preparing to Bake
As your loaves undergo their second rise, preheat your oven to 190°C (375°F). Once they’ve doubled in size again, brush the tops with melted butter for added flavor and a golden finish. This step is optional but highly recommended for that extra touch of indulgence.
The Aroma of Freshly Baked Bread
As your loaves bake in the oven, your kitchen will be filled with the irresistible aroma of freshly baked bread. There’s something truly magical about the scent of warm bread wafting through the air, signaling that a delicious treat is on the horizon.
Optional Butter Topping
For an extra indulgent touch, why not slather your freshly baked bread with a generous layer of butter? Not only does it add richness and flavor, but it also gives your bread a beautiful golden sheen that’s sure to impress.
Baking Your Bread
After 30 to 35 minutes in the oven, your bread should emerge golden brown and irresistibly fragrant. Remove them from the oven and let them cool slightly before slicing into thick, pillowy slices. Whether enjoyed warm with a pat of butter or used to make your favorite sandwiches, this homemade bread is sure to delight your taste buds.
Enjoying Your Homemade Delight
Congratulations, you’ve just mastered the art of quick homemade bread in just five minutes of prep time! With this foolproof recipe, you’ll never have to rely on store-bought bread again. So gather your ingredients, roll up your sleeves, and get ready to enjoy the simple pleasure of freshly baked bread whenever you please.
FAQs (Frequently Asked Questions)
1. Can I use instant yeast instead of active dry yeast? Yes, you can substitute instant yeast for active dry yeast in this recipe. However, you may need to adjust the rising time slightly as instant yeast tends to work faster.
2. Can I use whole wheat flour instead of all-purpose flour? Absolutely! Whole wheat flour can be used in place of all-purpose flour for a nuttier flavor and added nutritional benefits. Just be aware that whole wheat flour may result in a denser loaf.
3. Can I freeze the dough for later use? Yes, you can freeze the dough after the first rise for later use. Simply shape the dough into loaves, wrap tightly in plastic wrap, and freeze. When ready to bake, allow the dough to thaw and rise before baking as usual.
4. How long will homemade bread stay fresh? Homemade bread is best enjoyed within a few days of baking for optimal freshness and flavor. To extend its shelf life, store your bread in a paper bag or bread box to prevent it from becoming stale.
5. Can I add herbs or cheese to the dough for extra flavor? Absolutely! Feel free to experiment with different flavorings such as herbs, spices, or cheese to customize your bread to your liking. Just be mindful of any additional moisture or ingredients that may affect the texture of the dough.
Now that you’re armed with all the knowledge and skills you need, it’s time to roll up your sleeves and embark on your bread-making adventure. With a little practice and a lot of love, you’ll soon be churning out delicious homemade bread that will impress even the toughest bread critics. Happy baking!