1. Introduction
Who can resist the allure of freshly baked bread? There’s something magical about the aroma that fills the kitchen, promising warmth and comfort with every slice. In this guide, we’ll explore the art of homemade bread, providing you with a step-by-step recipe that will have you baking like a pro in no time.
2. The Joy of Homemade Bread
Homemade bread is more than just a staple; it’s a labor of love. Unlike store-bought loaves, homemade bread carries with it a sense of pride and satisfaction. From kneading the dough to watching it rise, every step in the process is an opportunity to connect with the ancient art of baking.
3. Getting Started: Ingredients and Tools
To embark on your bread-making journey, gather the following ingredients and tools:
- 650g of flour
- 2 tablespoons of sugar
- 7g of dry yeast
- 1.5 teaspoons of salt
- 500ml of sparkling water
- 150g of additional flour
- Oil for greasing the table and baking molds
4. Step-by-Step Guide to Baking
Mixing the Ingredients:
Start by sifting the flour into a bowl, then add sugar, dry yeast, and salt. Mix well before incorporating the sparkling water to form a dough.
Letting it Rise:
Grease a bowl with oil, place the dough inside, cover it with a tea towel, and let it rise for 45 minutes in a warm place until it doubles in size.
5. Let’s Get Rolling: Shaping the Dough
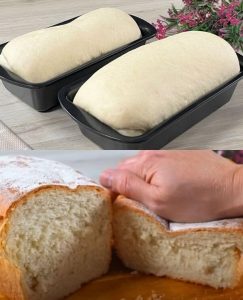
Forming the Loaves:
After the dough has risen, divide it into two halves and shape each into a ball. Allow them to rest for 20 minutes before rolling them out on a greased surface.
Baking Preparation:
Once rolled out, shape the dough into loaves and place them in greased baking molds. Brush the tops with water and sprinkle with flour for that perfect crust.
6. The Baking Process: From Oven to Table
Baking Time:
Preheat your oven to 180°C and bake the loaves for 40-45 minutes until golden brown and cooked through.
Checking for Doneness:
To ensure your bread is ready, tap the bottom – it should sound hollow. Remove from the oven and let cool slightly before slicing.
7. Serving with Love and Satisfaction
Enjoying the Fruits of Your Labor:
Serve your freshly baked bread with love and enjoy the satisfaction of creating something delicious from scratch. Whether paired with soup, slathered in butter, or enjoyed on its own, homemade bread is always a treat.
8. Frequently Asked Questions (FAQs)
Q1. Why is homemade bread better than store-bought? Homemade bread allows you to control the ingredients, ensuring a healthier and more flavorful loaf.
Q2. Can I freeze homemade bread? Yes, homemade bread freezes well. Simply wrap it tightly in plastic wrap and store it in an airtight container for up to three months.
Q3. How do I know if my dough has risen enough? Your dough should double in size during the rising process. Press a finger gently into the dough – if the indentation remains, it’s ready to shape.
Q4. Can I substitute sparkling water with regular water? While sparkling water adds a lightness to the dough, you can use regular water if preferred. However, the texture may differ slightly.
Q5. Can I add additional ingredients like herbs or cheese to the dough? Absolutely! Experiment with different flavors by adding herbs, cheese, or even olives to the dough before shaping.